


Given the amount of times I’ve mentioned how cheap it is to have a decent home recording set-up, I figured I ought to come clean about the gear I use.
Software
I use GarageBand on a 4 or 5 year old MacBook. If you’re a Mac user, the computer is obviously the most expensive part of your gear. But if you’re a Mac user, hopefully you already have the Mac and included with it is a great piece of studio gear: GarageBand.
If you’re a Windows user and you don’t want to spend a lot of money, check out Audacity and Reaper. Both require a lot of workarounds and some struggle with drivers and such, but as a Windows user, you’re probably used to that. That’s what you signed up for when you chose that operating system.
That said, there is a lot of room to make Audacity or Reaper into the perfect studio software for yourself. So if you want to invest less money but more time setting yourself up, you might just find that perfect hand-in-glove situation with a Windows machine and one of those softwares. (But be aware that things won’t be as simple as I describe below.)
If you’re a Linux user, may Kabbalah Monster bless you. I have no idea how to help you. But you might want to check out Ubuntu Studio and Audacity is available for Linux as well.
An interface
The first physical gear you’re going to need (besides, you know, instruments) is an interface to connect your instrument to your software. I use the Scarlett 2i2. It is a dead simple interface that accepts microphone or instrument cables and outputs through USB.

The 2i2 costs $150. It has two inputs which both accept XLRs (microphone cable) or quarter inch instrument cable. Those inputs allow you to select whether you’re running a line in (a mic that requires a preamp boost) or an instrument. Each input has a preamp gain so you can adjust the signal going into your software. It also has that 48V phantom power for when you’re connecting a mircophone or two.
When you do connect two microphones or instruments, it plays really nicely with GarageBand’s multitrack mode. In fact, my 2i2 was plug-and-play with my Mac. I didn’t have to install any additional software. I booted up GarageBand and plugged the Scarlett in. GarageBand recognized it and asked if I wanted to use it as the input.
One really easy, great feature of the 2i2 is the separate monitor volume. It’s a nice addition to GarageBand to be able to monitor your recording through this separate interface and not rely on your Mac’s tiny ⅛” headphone jack.
Also, the 2i2 just looks great. It has an aluminum casing and while it isn’t heavy, it feels real. It’s not a cheap plastic piece of crap with decent electronics. It’s a well-designed tool that feels great.
Studio headphones
You’re going to need some decent studio headphones. I know I’ll probably catch flack for this but when I say “decent studio headphones,” what I really mean is “NOT Beats.” Also, earbuds are out. You need headphones that play back an extremely flat sound with no built-in EQ (like the bass resonance in Beats). You want a flat sound because you need to know exactly what your recordings sound like without equalization. This enables you to EQ your recordings properly in the mix. If you record with headphones that have a great bass bias, you’re going to compensate in your recording with more mids and trebles. And that will suck when you go to mix and have no bottom end. Or it will sound great to you in your Beats and you’ll play it in a car or on your phone and notice the body of your sound is missing.

All that said, you don’t have to spend a lot on studio headphones. Some good Audio Technicas are less than $100. I’m slightly embarrassed to confess that I’ve relied on really cheap Sonys for years and currently have a pair of Audio Technica ATH-M2Xs. While the sound is good and pretty flat, the main problem I’ve encountered with my headphones is that they leak audio when I’ve cranked up the monitor and am recording through a microphone (i.e. you can hear the playback of my headphones in the microphone I’m using on a new track).
I’ll happily confess to shortcomings like that because my outlook is that I want to do the best with the basics. Flat-sounding headphones that occasionally leak are preferable to pricey cans that give me too much bass. We’re all trying to do the most with the least and it’s more important to get the basics covered than to blow your budget on one tool.
Microphones
Microphones in recording gear are like lenses to photographers: once you realize how different they are, you can have a closet full of them and still need more. They are simultaneously the most important part of recording an instrument and the most quirky. So it’s difficult sometimes to get good advice on them. When I started putting my home studio gear together in earnest, I asked my engineer friends and a few musicians what they used. The answers I got were similar to my headphone pointers above: get the flattest and simplest.
A sidebar: in the pre-laptop age, I owned a bunch of recording gear with my friend and bandmate Todd Kemp. Our mic collection varied wildly from some Radio Shack pieces of crap to a couple of decent condenser mics, to some broken-down SM57s. This is typical of indie musicians’ first forays into making recordings. The problem is that Todd and I aren’t studio gearheads. We didn’t have the time to learn the personalities of all those different mics. While we developed some rules for ourselves on how to set those mics up, we weren’t able to duplicate conditions perfectly every time.
So when I was assembling my own digital studio, I wanted to know I could consistently record an acoustic guitar or a vocal track without having to try out several temperamental microphones to see which worked best. I wanted to know: this is the setup for the acoustic guitar and that is the setup for the vocals. I was recording at nights and on weekends when I could sneak in a couple of hours. Often I had to put all my gear away after a session and set it all back up the next time. I couldn’t afford the time to find all the sweet spots every time I started up.
So here’s what that experience, attitude, and advice from others led to (listed in ascending order of greatness):
Shure SM57: This is the mic that you see everywhere. It’s $100 new but likely you can find them in a used music shop for $50 or so. I use them with spite. I recognize their utility, their simplicity, but I’m never really happy with them. That said, if I ever have to record a guitar amp or a snare drum, this is the mic I reach for. I don’t like them for vocals at all.
Shure SM58: This is the SM57’s nicer sister. Everyone told me to get one for basic vocal tracks and to toss in my gear box for live shows where I might not want my lips to bang into the club’s dirty-ass microphone. I mention it here because you might want an affordably-priced vocal microphone that you can also use in a live situation or on an amp in a pinch.
THAT’S WHAT EVERYONE TOLD ME, HOWEVER, I NEVER GOT ONE. INSTEAD, TRY THIS:
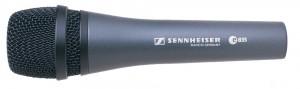

Sennheiser e835: This is a really similar mic to the SM58. I couldn’t elucidate the difference to you. I can only tell you: I love this hell out of this one while Shures don’t move me very much. I use it on vocals in the studio when I want a deader sound, on vocals live, and I would use it on an acoustic guitar in the studio (though I don’t think I ever have).
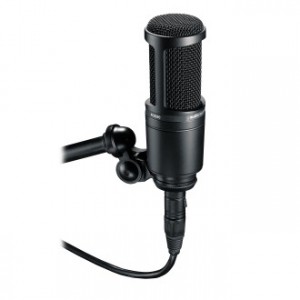
Audio Technica AT2020: This was the microphone that changed everything for me. It’s not too expensive (less than $200) and it just makes every sound like it’s supposed to sound. There’s no bias. Its character is almost a lack of character. It makes my guitar sound like my guitar and I don’t have to futz with the EQ on my vocals. I just have to sing and play well.
This is the microphone I use for everything acoustic in the studio. It’s a perfect mic for a non-engineer because it doesn’t require a lot of finesse. It does require phantom power. This is a condenser mic. The other three I’ve listed here are dynamic microphones which don’t require a preamp.
This is the rub: your vocals and acoustic instruments will sound better with a condenser microphone (generally speaking, they’ll sound “warmer”). However, the advice you’ll encounter online and from the experts is all over the map. You’ll hear about large diaphragms and small diaphragms and you’ll generally conclude that a condenser will either be too cheap and brittle or hella expensive. The AT2020 contradicts that terrible paradox: it’s reasonably-priced and it isn’t brittle. But it’s the next tool that makes it work…
A tube preamp
When you’ve got a condenser microphone, you’ve got to use phantom power to give it its juice. If you do that through a “solid state” solution, you’re going to get a colder sound. There’s no point in spending any money on a condenser mic if you’re going to power it through something solid state. You might blame the mic for the sound you get when it’s the preamp’s limitations causing the sound. You want a tube preamp. Here’s a decent one.
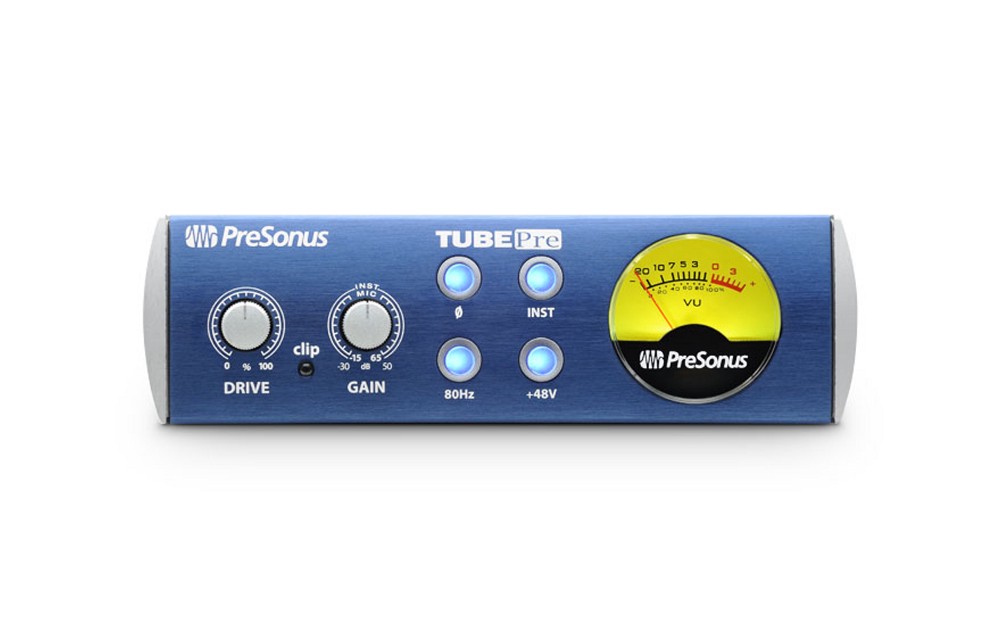
The PreSonus Tube Pre V2 costs around $150. It’s a single tube, single input/output. It has drive and gain controls along with a few basic features. The tube warms the sound of your condenser mic better than a solid state interface (like the Scarlett’s preamp) will do.
So the way I use it is that I run my AT2020 into the Tube Pre V2 and then run that into the Scarlett 2i2. I adjust my gain and drive through the Tube Pre V2 and leave the 2i2 pretty flat. I rarely use the 2i2’s phantom power. If I ever need phantom power, I put the V2 in my chain.
My main acoustic guitars have pickups in them. I often run a direct line from an acoustic’s pickup into the V2 to get a warmer (or even hot) signal for the guitar. When I record bass, I even run it into the V2 first. While the tube preamp doesn’t emulate an amplifier very well, it rounds out my direct signal so that if I put an amp profile on it in GarageBand, it sounds a bit more natural.
But that’s all gravy on top of the V2’s real purpose. It’s simple, affordable, and helps a basic condenser mic fulfill its promises.
Put it all together
If you’re an acoustic musician (who already owns a Mac with GarageBand), you could buy the Scarlett 2i2, the PreSonus Tube Pre V2, and one AT2020 and have a great sounding home studio for around $480. If you’re completely new to home recording, you might want to start with just the Scarlett 2i2 and an SM58 (or the Sennheiser e835) to capture your voice and guitar for around $300.
If you’re recording a band or amplified instrument, you might just need a few SM57s and the Scarlett 2i2 (of course with only two inputs, drums will be a challenge).
I hope this tour through the studio gear I own helps you see that it doesn’t take too much to start to put together a well-rounded sound. Once you get the basics down, you’ll get more comfortable with how you can play with each tool to shape your own personal sound.
My studio setup can be heard on tracks 1, 2, 3 and 9 from my record “I Survived the Dogstorm.”
It may interest you to know, there are no electric guitars on any of those songs. All those tones come from my acoustics and different mic’ing, pre-amping, and some amp profiles in GarageBand. Once I recorded the basic tracks, I sent the files to Jeremy Ferguson who mixed and mastered what I’d recorded in my apartment. Tracks 4, 5, and 6 were recorded by Allen Morris who mixed and mastered them. Tracks 7 and 8 were recorded in Battle Tapes studio by Jeremy Ferguson who mixed and mastered them.
While it’s obvious that all the songs on this record were recorded with various studio setups, I hope you hear that those I recorded by myself don’t sound too amateurish next to those recorded by professionals in professional environments.
Comments
No comment